Monday, December 10, 2012

Installing Sun JDK, MySql and Apache Tomcat on Ubuntu Linux


Sun Java 6 Installation

To install Sun JDK 6 on ubuntu:

1. Open Terminal
To open Terminal click the Dash home from unity launcher. And type terminal in the search field.And click Terminal.

2. Type the below code in terminal and hit enter.
sudo add-apt-repository ppa:ferramroberto/java
Type your ubuntu password if needed and press enter.

3. Then press enter to continue or ctrl-c to cancel adding the ppa.
  
4. Type below command and hit enter
sudo apt-get update

5. Then type below command and press enter
sudo apt-get install sun-java6-jdk sun-java6-plugin

6. Type y and hit enter to confirm the installation.

7. Select
OK
and press enter enter

8 . To accecpt the DLJ licence select yes and press enter  

9. After the successful installation,to check the installed version type
java -version

MySQL 5.0 Installation 

MySQL is a fast, multi-threaded, multi-user, and robust SQL database server. It is intended for mission-critical, heavy-load production systems as well as for embedding into mass-deployed software.

Installation 
To install MySQL 5.0, Run the following command from a terminal prompt:
sudo apt-get install mysql-server

During the installation process you will be prompted to enter a password for the MySQL root user.
Once the installation is complete, the MySQL server should be started automatically. You can run the following command from a terminal prompt to check whether the MySQL server is running:
sudo netstat -tap | grep mysql

When you run this command, you should see the following line or something similar:

tcp        0      0 localhost.localdomain:mysql           *:* LISTEN -

If the server is not running correctly, you can type the following command to start it:
sudo /etc/init.d/mysql restart

Configuration

You can edit the /etc/mysql/my.cnf file to configure the basic settings -- log file, port number, etc.
For example, to configure MySQL to listen for connections from network hosts, change the bind_address directive to the server's IP address:

bind-address            = 192.168.0.5

[Note]     

Replace 192.168.0.5 with the appropriate address.

After making a change to /etc/mysql/my.cnf the mysql daemon will need to be restarted:

sudo /etc/init.d/mysql restart


Resources

See the MySQL Home Page for more information.

The MySQL Handbook is also available in the mysql-doc-5.0 package. To install the package enter the following in a terminal:

sudo apt-get install mysql-doc-5.0

The documentation is in HTML format, to view them enter
file:///usr/share/doc/mysql-doc-5.0/refman-5.0-en.html-chapter/index.html 
in your browser's address bar.

Run MySql Server:
Launch terminal and execute following command

mysql -h <ipaddress> -u <username> -p

for example

mysql -h localhost -u srinu -p

This will prompt for the password, once successfully entered will show you the following mysql prompt

mysql>   

Install Apache Tomcat 7 on Ubuntu
Apache has officially launched version 7.0 of the servlet container for Java applications, Tomcat. Major changes in this version, you can highlight support for Servlet 3.0 and JavaServer Pages 2.2.

Installation:

1. Install JDK
2. download the package "apache-tomcat-7.0.6.tar.gz" from http://tomcat.apache.org/download-70.cgi [tar.gz]

Now unpack it with the following command:
tar xvzf apache-tomcat-7.0.8.tar.gz

Then we let in a more appropriate directory, in our case in /usr/share/tomcat7, but can be in any directory.

We do this with the command:
sudo mv apache-tomcat-7.0.8/ /usr/share/tomcat7

Now we define the environment variables
JAVA_HOME and JRE_HOME

This file is in the "environment" in /etc. 

Command to edit the file:
sudo gedit /etc/environment

Here we record the routes where we have installed Java in my case this is as follows:

JAVA_HOME="/usr/local/jdk1.6.0_23"
JRE_HOME="/usr/local/jdk1.6.0_23/jre"

PATH="...(other path):$JAVA_HOME:$JRE_HOME"

IMPORTANT: Verify the routes where they have installed Java.

I have had some problems in defining these environment variables,
as sometimes tomcat does not recognize,
but a surefire way of recognizing that tomcat is to define the file paths inside "catalina.sh"located intomcat7/bin.

To modify this file use the command:
sudo gedit /usr/share/tomcat7/bin/catalina.sh

Now just insert the JAVA_HOME and JRE_HOME after the first line,
so the file is as follows:

#!/bin/sh
JAVA_HOME="/usr/local/jdk1.6.0_23"
JRE_HOME="/usr/local/jdk1.6.0_23/jre"
# Licensed to the Apache Software Foundation (ASF)...
#...
#...
....

Now let's configure Tomcat users,
this is done in the file "tomcat-users.xml"directory tomcat7/conf.

Unlike previous versions where the administrator should own role "manager" now it should be "manager-gui"to operate on the web administration tomcat7.

The file would be as follows:


<?xml version='1.0' encoding='utf-8'?>

<tomcat-users>
<role rolename="manager-gui"/>
<role rolename="manager-script"/>
<role rolename="manager"/>
<role rolename="admin-gui"/>
<role rolename="admin-script"/>
<role rolename="admin"/>

<user username="usuario" password="contrasena" roles="manager-gui,admin-gui,manager,admin,manager-script,admin-script"/>
</tomcat-users>


Now you should be all ready to try tomcat7.

First we must lift the server with the following command:
sudo /usr/share/tomcat7/bin/startup.sh

With this we get the following output on console:

Using CATALINA_BASE: /usr/share/tomcat7
Using CATALINA_HOME: /usr/share/tomcat7
Using JRE_HOME: /usr/local/jdk1.6.0_20/jre
Using CLASSPATH: /usr/share/tomcat7/bin/bootstrap.jar:/usr/share/tomcat7/bin/tomcat-juli.jar

Verify that the JRE_HOME is where we define.

Now open your web browser and type the following url:

http://127.0.0.1:8080/

If we enter the administration Tomcat Manager we click on the menu or directly at URL:

http://127.0.0.1:8080/manager/html

Here we ask the user data from previous record in mind tomcat-users.xml.

I recommend testing the sample to make sure everything works ok, they are in the section "Miscellaneous" from the side menu or at the URL:
http://127.0.0.1:8080/examples/

Commands

Start server:
sudo /usr/share/tomcat7/bin/startup.sh

Stop server:
sudo /usr/share/tomcat7/bin/shutdown.sh


Tomcat should now be fully installed and operational. Enjoy!

Friday, November 9, 2012

INSTALLATION OF ECLIPSE

Here is how you can install JAVA Eclipse on Windows 7

  • Decide which version you want to use. If you are using 64-bit windows 7, you should install 64-bit JAVA JDK and JAVA Eclipse. If you are using 32-bit windows 7, you should install 32-bit JAVA JDK and 32-bit JAVA Eclipse.


  • Download and install JAVA JDK from here.

  • After JAVA JDK is download, install it as we normally install any software on Windows.

  • Download JAVA Eclipse from here.

  • After you have downloaded JAVA Eclipse, extract it using any zip software like winzip, winRaR. Do not use Windows default explorer to extract files, as it may not extract files properly. It will create a folder “eclipse”, with multiple subdirectories under that.

  • JAVA Eclipse is installed now. Double click eclipse.exe to run JAVA eclipse

Note : If u want to get help for how to install JDK and JRE  click here

Saturday, November 3, 2012

scan your websites / files using multiple antivirus

Saturday, February 25, 2012

How to install and configure phpmyadmin

PhpMyAdmin is a nice database management and administration tool, it is easy to install it, but some people are having problems making it work under apache, that’s because it needs configuration. I presume you already have LAMP installed and configured on your machine, if not, please read this post – Install and Configure LAMP on Ubuntu first.

ust in case you haven’t installed phpMyAdmin yet, type the following line in the Terminal:

sudo apt-get install phpmyadmin

To set up under Apache all you need to do is include the following line in /etc/apache2/apache2.conf, first type the following command to open up this file:

gksudo gedit /etc/apache2/apache2.conf

Add the following line of code inside apache2.conf:

Include /etc/phpmyadmin/apache.conf

Now restart Apache:

sudo /etc/init.d/apache2 restart

Monday, February 13, 2012

Touchpad Problem - shortly after login, it stops working

I've Ubuntu 11.10 and my problem is about the touchpad. At the beginning of my computer it's works fine, but after opening an application or a few minutes, it stops working and I have to use a USB mouse.

sudo modprobe -r psmouse && sudo modprobe psmouse

i tried this command  and now its working good....

if u have the same problem in LENOVO G560 you can try this command.


Wednesday, February 8, 2012

Sublime Text 2 – A Fast & Fancy Text Editor

The tiny bit of developing I do means Gedit, Ubuntu’s default text editor,  is more than adequate for my (very basic) needs.

But for proficient programmers a good text editor is as important to productivity as a finely tuned car is to a professional race driver.

Okay, slightly exaggerated comparison, but the point is still valid; we all work best when using tools that help us and not hinder us.

And so Sublime Text 2, a proprietary IDE currently in beta that’s often described as being better than the popular mac client ‘TextMate’.

A developer ecosystem surrounds the application, crafting ever-new plugins and add-ons to extend the functionality.

Other features include:-
  • Cross platform
  • Instant project switching
  • Fast
  • ‘Go to anything’ search feature (CTRL+P)
  • Dark colour scheme that’s easier on the eyes
  • Auto-complete feature
  • Distraction-free mode
  • Plug-ins
Packages can be downloaded from the Sublime Text 2 site linked by the button below. Whilst Sublime Text 2 is not free, a per-user license costs $59, it is free to use for evaluation purposes with no time limit.
The folks at tutsplus have put together a handy list of Sublime Text 2 tips and tricks, so be sure to head there after installing.

CLICK HERE TO DOWNLOAD


Sunday, February 5, 2012

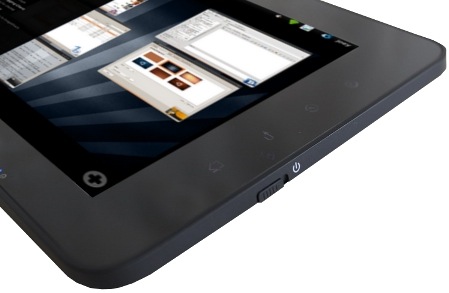
Ekoore Python S Tablet Triple Boots Ubuntu, Android & Windows 7

A new Ubuntu tablet is on the market – but it comes with company.
The Ekoore Python S tablet ships with three operating systems installed. Only one OS can be used at a time on the device.
  • Ubuntu 11.10 
  • Windows 7
  • Android 4.0 (Ice-Cream Sandwich)
Ekoore Python S Tablet
On to the hardware.
Specification wise the Python sports a notable difference from most tablets already on the market: it uses an Intel Atom CPU rather than an ARM processor. It’s this which allows the Python S to run Windows 7.
Full specs:
  • Intel Atom N455 1.60Ghz CPU (Single Core)
  • Integrated Graphics (website states clocked at 200Mhz)
  • Up to 2GB RAM
  • Up to 64GB SSD
  • 10.1 inch capacitive touch screen
  • Wifi, Bluetooth, 3G, Accelerometer
  • 5 Hour Battery
Ports wise the python has:
  • Mini VGA
  • 2xUSB
  • Microphone/headphone jack
  • MicroSD card slot
  • SIM Card Slot
The Python S retails at a somewhat steep €499 (equivalent to $655/£415).
The case of the tablet does, from the handful of press shots available, look okay. It’s chunkier (14.5mm) than the svelte slates most of us are used to seeing (the ASUS Transformer Prime is 8.3mm thick), but given the Intel NM10 chipset (and fan!) its housing this is to be expected.
The blue-backlit buttons on the front of the device are pretty nice touch (pun intended).


Resource Editor: How To Open an EXE/DLL File For Editing

Resource Tuner lets you open Windows executable files such as .EXE, .DLL, Device Drivers (.SYS), OCX Controls, and several others. Once inside, you can change the look of the icons, cursors, dialogs, buttons, sounds, animations and other elements of the Windows user interface by editing and replacing resources in the executable files.

For more serious changes (though this may not do you any good unless you have a good understanding of programming functions), check out PE Explorer. For viewing and editing the raw binary data contents of the DLL file, use Flex Hex Editor.

Most people asking how to open/edit .EXE or .DLL files are actually not really aware of what they are trying to deal with. EXE and DLL files are not plain, traditional text ASCII files that you can easily read and edit. You cannot simply open up an .EXE like a text file and start editing or reading the contents. Sometimes the only meaningful information inside DLL files is Vendor information (copyrights, trademarks, origins) and Product Version information. These binary files have a complex nested structure defined by the Portable Executable format, and they are not intended to be editable by users, neither are DLLs meant to be opened separately from the programs they belong to.

However, if you do want to change something in an EXE or DLL file for whatever reason, you may be able to do this by changing their resources with Resource Tuner. But still you will not be able to modify the actual code in any way: resources are separated from the program code. This way, you can make significant changes to the interface of the program while leaving the code untouched. You may also be able to translate the program interface into another language.

you can download the trail version from HERE

Saturday, February 4, 2012

Ubuntu 12.04 Alpha 2 Released

The second alpha of Ubuntu 12.04 has been made available for download.
As Ubuntu 12.04 is a ‘Long Term Support’ release development is focused on creating a dependable stable experience. As such this latest Alpha features only a handful of modest user-visible changes to the desktop.


New Unity Configuration options have been added to the User Interface (formerly called ‘Appearance‘) pane in System Settings.
The leaner, faster Unity 5.0 is included. This brings a handful of minor new features to the desktop including Lens Quicklists:

Home folder Quicklists: -

Additional options in CCSM for adding a ‘Show Desktop’ item, changing Dash colour, etc.
The Unity Greeter – Ubuntu’s login screen – has been updated to display the wallpaper of the user selected.

Unity’s Overlay Scrollbars sport a slightly chunkier look: -

One new function you might be expecting to find in the Alpha is Ubuntu’s much-heralded ‘HUD’. This is not included in the Alpha build but it can be installed in Ubuntu 12.04 by adding the HUD testing PPA.

General Stuff

Alpha 2 specifics aside there are a number of other general changes testers should be aware of:
  • Rhythmbox is the default music player
  • There is no Ubuntu One Music Store plugin at present
  • Tomboy and gBrainy are no longer installed by default
  • LibreOffice 3.5 beta 2 is installed
  • ‘Apport’ Crash reporting is enabled by default

Download Ubuntu 12.04 Alpha 2

click here to download  


Mind Labyrinth – Ubuntu’s First Mind-Controlled Game

A new retro-styled puzzle game that can be played using the mind is on its way to the Ubuntu Software Center.

The 52-level strong puzzle game ‘Mind Labyrinth‘ is the first game on Linux to make use of the wireless Mindwave EEG headset from Neurosky.

With the headset connected and the game open, you will need to put your mind to work inorder to move obstacles, make gears work, and recover health points.

Playing Without Headset

f you don’t have a brain-powered controller (and there’s only a slim chance that you do) you don’t have to miss out as Mind Labyrinth can be played using a bog-standard mouse.

In this mode the game feels a little too simplistic; you simply walk a character to a ‘goal’ point by clicking. Admittedly as you progress through levels this becomes a tad tricker, but overall it presents nothing that would tax – or entertain – ardent gamers.


Monday, January 30, 2012

Sitting In Front of Computer For Long Hours ???? Do u Feel Eyes are Burning ????

Sitting In Front Of Ur PC or Laptop For Long Hours ???? Are Ur Eyes Burning Bcos of this ??? Then Here is a Solution !!!!
Get hold of a Software called " f.lux " . It makes the color of your system's display adapt to the time of the day , warm at night and like sunlight during the day. You could use f.lux because it even makes you sleep better and make your computer look better.
F.lux makes your computer screen look like the room you are in all time. When the sun sets it make your screen look like your indoor lights. In morning it makes things look like sunlight again.
Tell flux about what kind of light you have and where you live in. Then forget about it. F.lux will do the rest automatically.
Download the software from.....
 
 
i hope this may be helpful to you all :) enjoyyy.....:)
 

WHY MR.VIRUS CANNOT CONQUER THE MIGHTY LINUX.

The following are main reasons why virus have failed to invade the Linux operating system
1. Linux does not execute any file automatically, hence virus cannot execute when we start a program.
2. The kernel of Linux is re-bootable, hence each and every time a fresh configuration is loaded.
3. No virus has been programmed for Linux system. All the viruses are majorly coded to target the windows.
4. Linux provides security by halting auto executable files.
5. Linux has an inbuilt firewall.

Open Source Equivalents

Commercial Software Category Open-Source Equivalent AntiVirus Tools (eg. Norton, McAfee) No open-source tools recommended
Use Grisoft AVG or AntiVir


Application Servers (eg. IBM WebSphere, BEA WebLogic)
Enhydra
JBoss
JOnAS
Tomcat (servlet container)
Zope

Asset Management (eg. Intuit, Peregrine, Remedy)
IRM

Audio Editing (eg. Sony Sound Forge, Syntrillium Cool Edit)
Audacity
GLAME

Backup Utilities (eg. CA ARCserve, Legato, Veritas)
Amanda
BackupPC
Bacula
Rsync

BioInformatics (multiple highly specialized vendors)
Open BioInformatics Foundation
OpenInformatics

Business Graphics (eg. Microsoft Visio)
Dia
Kivio
OpenOffice Draw
StarOffice Draw
Xfig


CD / DVD Burning (eg. Adaptec RecordNow, Roxio CD Creator)
ECLiPt Roaster
X-CD-Roast

Configuration Management (eg. IBM Rational ClearCase)
Arch
CVS
OpenCM
PRCS
RCS
Stellation
Subversion

Content Management Systems (eg. Documentum, Interwoven, Vignette) Bricolage
Drupal
eZ publish CMS
Joomla!
Lenya
Mambo
OpenCMS
opensourceCMS
PHP-Nuke
phpWebSite
Plone
PostNuke
Xaraya

CRM Applications (eg. Microsoft CRM, Siebel)
Anteil
Compiere
SugarCRM
vtiger CRM

Database Software (eg. Microsoft Access, SQL Server)
Firebird
Gaby
Ingres
Knoda
MySql
Novinyl
PostgreSQL
Qddb

Database Tools (eg. Crystal Reports, ERWin, Microsoft Access)
Agata Report
DBDesigner 4
mySiteMaker
OpenRPT
Total Rekall


Desktop Publishing (eg. Microsoft Publisher, Quark Xpress)
Scribus

Directory Servers (eg. Microsoft Active Directory)
OpenLDAP


Disk Imaging (eg. Norton Ghost)
Mondo

E-mail Applications (eg. Microsoft Outlook Express)
KMail
Mozilla and Thunderbird
Sylpheed
Ximian Evolution

E-mail List Manager
PHPlist


E-mail Servers – POP and SMTP (eg. Microsoft Exchange)
Exim
qmail
InterNetNews
Majordomo
Postfix
SendMail
SquirrelMail

E-mail Servers – IMAP Courier IMAP
Cyrus IMAP
UW IMAP

ERP and Financial Software (eg. Oracle, SAP, Intuit QuickBooks Compiere)
GNUCash
GNU Enterprise
NOLA

Open for Business
OpenMFG
SQL Ledger
Tiny ERP
TurboCASH
webERP


FAX Server (eg. Biscom) HylaFAX


File Compression (eg. PKzip, WinZip) 7-zip
Ark
bzip2
gzip

Flash Viewers (eg. Macromedia Flash) Flash for other OS’s

Forums, Blogs (Weblogs) or Bulletin Boards EasyMoblog
phpBB
Pivot
Thingamablog
WordPress
YaBB
Yet Another Forum.net

Graphics and Image Editors (eg. Adobe Illustrator, PhotoShop)
CinePaint
GIMP
ImageMagick
Inkscape
Karbon
Sodipodi

Groupware (eg. Microsoft Exchange, Lotus Notes)
dotProject
Horde
Kolab
Lucane
Mimerdesk
OpenGroupware
Open-Xchange
phpCollab
phpGroupWare
PHProjeckt
TUTOS

Help Desk (eg. BMC Remedy, FrontPage Heat, Intuit Track-It)
Bugzilla

Information Resource Manager
OneOrZero
phpSupport
php Support Tickets
RT: Request Tracker

HTML Editors (eg. DreamWeaver, FrontPage, HomeSite)
Bluefish
Mozilla Composer
Nvu
Quanta Plus

Instant Messaging (eg. AIM, MSN, Yahoo!)
Ayttm
Gaim
GnomeICU
Licq

Integrated Dev Environments (eg. Microsoft Visual Basic, Visual Studio) Anjuta
Eclipse
GLADE
GNU Compiler Collection
GNU Project Debugger
NetBeans
XEmacs

Modeling Tools (eg. IBM Rational Rose, CA AllFusion)
ArgoUML
Umbrello

Network Diagramming and Monitoring Cacti
Ethereal
Etherape
JFFNMS
Kaboodle
MRTG
ntop
RRDtool
Snort (intrusion detection)


Network Management Tools (eg. HP OpenView, Microsoft SMS)
BO2K
Cheops
Nagios
OpenNMS
Webmin

Office Productivity Suites (eg. Microsoft Office)
GNOME Office
KOffice
OpenOffice
StarOffice


Operating Systems (eg. Microsoft Windows)
freeBSD
freeDOS
Linux
NetBSD
OpenBSD
OpenSolaris (Sun)

Samba (file/print services)

PDF File Viewer and Creator (eg. Adobe Acrobat)
GhostScript
PDFCreator

Personal Financial Managers (eg. Microsoft Money, Intuit Quicken)
GNUCash
Grisbi
jGnash

Personal Information Managers (eg. Microsoft Outlook)
Aethera
KDE-PIM
Linux Organizer
TreeLine
TuxCards
Ximian Evolution

Photo Album Manager (or Photo Organizer)
digiKam

Portal Servers (eg. Microsoft Sharepoint, Plumtree, Vignette)
Gluecode (built on open source)
GridSphere
JBoss Portal
Liferay Portal
Metadot


Presentation Software (eg. Microsoft Powerpoint)
OpenOffice Impress
StarOffice Impress
Privacy (eg. Pretty Good Privacy) AxCrypt
GnuPP
GPG
TrueCrypt

Programming Languages
Perl
PHP
Python
Ruby


Project Management and Collaboration (eg. Microsoft Project)
Achievo
GanttProject
GanttPV
Mr Project
NetOffice
Open Workbench
Outreach Project Tool
Planner
TUTOS

Remote Access (eg. Symantec pcAnywhere or VPN appliances)
OpenVPN
rdesktop
Stunnel
tinc
UltraVNC
VNC – Virtual Network Computing


Security (eg. firewalls, scanners)
Firestarter (firewall)
IPCop (firewall)
Nessus (scanner)
Nikto (scanner)
Nmap (scanner)
Paros (proxy)
SmoothWall (firewall)

Spam Filters (eg. MailWasher, SpamEater)
MailScanner
POPFile
SpamAssassin
SpamBayes

Spreadsheets (eg. Microsoft Excel)
Gnumeric
OpenOffice Calc
StarOffice Calc

Terminal Server (eg. Microsoft Windows Terminal Server)
Linux Terminal Server Project

Test Tools (eg. IBM Rational, Mercury Interactive, Segue)
Apache JMeter Load Tester
JUnit Testing Framework


Web and FTP Servers (eg. Microsoft IIS)
Apache HTTP Server
FileZilla
ProFTPD
Squid Proxy and Cache
squidGuard Access Controller


Word Processors (eg. Microsoft Word)
AbiWord
OpenOffice Writer
StarOffice Writer

Sunday, January 29, 2012

Installing GNS3 on Ubuntu 10.04+

First, you have to install the dynagen and python-qt4 packages.

 sudo apt-get install dynagen python-qt4
 
After that, you have to download GNS3 source for Linux. You can either
 download it from their website or you can use the terminal to download it for you.
 
cd /opt
sudo wget http://downloads.sourceforge.net/gns-3/GNS3-0.7.4-src.tar.bz2?download
sudo tar -xjvf GNS3-0.7.4-src.tar.bz2?download
sudo mv GNS3-0.7.4-src /opt/GNS3

During my installation, the latest version is v0.7.4. Check this website first to see what is the latest version: http://www.gns3.net/download
Create the following directories inside the GNS3 directory: Dynamips, IOS, Project, Cache and tmp.
 
cd /opt/GNS3
sudo mkdir Dynamips
sudo mkdir IOS
sudo mkdir Project
sudo mkdir Cache
sudo mkdir tmp

Add Read and Write permissions for the other users to the following directories: Project, tmp and IOS.
 
sudo chmod o+rw -R ./Project
sudo chmod o+rw -R ./tmp
sudo chmod o+rw -R ./IOS

Download Dynamips and make it executable:
 
cd Dynamips
sudo wget http://www.ipflow.utc.fr/dynamips/dynamips-0.2.8-RC2-x86.bin
sudo chmod +x ./dynamips-0.2.8-RC2-x86.bin

The latest version available is 0.2.8. Check this website first to see what is the latest version: http://www.ipflow.utc.fr/dynamips/
Install the Qemu package.
 
sudo apt-get install qemu

That ends the installation of GNS3. The next steps will tell you how to configure GNS3.
Create a launcher for GNS3
In the Desktop, create a new launcher and use the following command:
 
python "/opt/GNS3/gns3"

Or you can use the Main Menu configuration to add one.
Launch GNS3 and go to Edit > Preferences > Terminal Settings > Preconfigurated Terminal Commands
Select Gnome Terminal (Linux)
You will see that the Terminal Command will be similar to this:
 
gnome-terminal -t %d -e 'telnet %h %p' >/dev/null 2>&1 &

In the General Settings tab, look for Paths:
Configure the Project directory:
 
/opt/GNS3/Project

Image directory:
 
/opt/GNS3/IOS

Go to the Dynamips tab and look for the Executable path:
 
/opt/GNS3/Dynamips/dynamips-0.2.8-RC2-x86.bin

Working Directory:
 
/opt/GNS3/tmp

Go to the Capture tab and look for the working directory for capture files:
 
/opt/GNS3/Project

 Go to the Qemu tab and set the Path to qemu:
 
/usr/bin/qemu

Path to qemu-img
 
/usr/bin/qemu-img

That’s it. You now have installed and configured GNS3 to run on Ubuntu. You just have to own an IOS to start setting up your routers.

BEST MUSIC PLAYERS FOR UBUNTU

1. AMAROK

 Amarok is a powerful music player with an intuitive interface. It makes playing the music you love and discovering new music easier than ever before and it looks good doing it! Amarok is based on the powerful Qt4 / KDE4 Platform and nicely integrates with KDE desktop.

Much work has been invested into integrating Amarok 2 with various Web services:

Ampache

Jamendo Service

Last.fm

Librivox

MP3tunes

Magnatune

OPML Podcast Directory

Amarok comes with a lot of features including but not limited to:

Scripts - enhance your Amarok experience with community developed scripts.

Dynamic Playlists - create playlists that automatically update.

Context View - customize interface with the Plasma powered Context View.

PopUp Dropper - simplify drag&drop actions with revolutionary menu system.

Multiple Language Translations

Collection Management - organizing your music collection has never been easier with Amarok's powerful tagging, renaming, and sorting abilities.

Database Importing - import collections from Amarok 1.4 or iTunes.

Scriptable Services - integrate other web services into Amarok.

2. BANSHEE

Play your music and videos. Keep up with your podcasts and Internet radio. Discover new music and podcasts. Keep your portable device loaded with good stuff.
Simple enough to enjoy. Powerful enough to thrill. Open source through and through.

3. MINIROK
Minirok is a small music player written in Python for the K Desktop Environment. As its name hints, it's modelled after Amarok, but with a reduced set of features. In particular, it is designed to cover all the needs and wishes of the author, leaving everything else out. The look and feel is almost identical to Amarok's, though.

The main interface is a *tree view of the filesystem*, with a playlist that can only
be populated via drag and drop. There is no collection built from tags, so it's targeted at people whose collection is structured in a tree already at the filesystem level. Searches can be performed both in the tree view and the playlist.

Other features include:

DBus interface for controlling the player and retrieving the currently played track, among other things

alter the playing order in the playlist by queueing tracks; stop after a certain track; repeat track or playlist; random mode; undo and redo

reading of tags when adding to the playlist can be disabled by specifying a regular expression to extract them from the filename

submission of played songs to Last.fm

global shortcuts

Minirok is written using the PyKDE bindings and the GStreamer media framework.

4. jlGui Player

jlGui is a Music Player application for the Java Platform. It supports MP3, OGG Vorbis, FLAC, MONKEY's AUDIO, WAV, AIFF, AU and SPEEX audio formats. Front-end is WinAmp skins 2.0 compliant.


Friday, January 27, 2012

INSTALL UBUNTU ON EXTERNAL HARD DRIVE

Ubuntu can be installed with the graphical CD. Make sure that your computer is set to boot from a CD before a hard drive.
  1. Insert the Ubuntu disc into your CD drive.
  2. Start or restart your computer. The Language screen appears. If you reboot your computer and do not see the language selection screen (seen below without the option to try without installing), please refer to BootFromCD.
    install-step1.png
  3. Select your desired language and click Install Ubuntu 10.04 LTS. The Where are you? window appears.
    install-step2.png
  4. Select the location closest to your location and click Forward. The Keyboard layout window appears.
    install-step3.png
  5. If the Suggested option is not correct, select the correct keyboard layout. Click Forward. The Allocate drive space window appears.
    http://pix.toile-libre.org/upload/original/1312973605.png
  6. If you want to install Ubuntu over your entire hard drive, then Select Erase disk and install Ubuntu and select the hard drive that you want to install Ubuntu.
    install-step4a.png
    Click Forward.
WARNING: Installing Ubuntu on your entire hard disk will erase all data that is currently on the drive.
OR
  1. If you want to install Ubuntu on a single partition Dual Booting, Select Guided – resize. In the New partition size area, drag the area between the two partitions to create your desired partition sizes. Click Forward.
    install-step4b.png
  1. The Who are you? window appears.
    install-step5.png
  2. Enter the requested information, and click Forward. The Ready to install window appears.
    install-step6.png
  3. Verify that the language, layout, location, and personal information are correct and click Install. The installation wizard begins.
    install-step7.png
  4. When the installation wizard finishes, the Installation complete window appears.
    install-step8.png
    Click Restart now to restart your computer. Ubuntu is now installed.